Test: Unterschied zwischen den Versionen
Zur Navigation springen
Zur Suche springen
 Klicken Sie auf ein Objekt in der Graphik, um auf die dessen Seite zu gelangen.
Porod (Diskussion | Beiträge) |
Porod (Diskussion | Beiträge) |
||
| Zeile 1: | Zeile 1: | ||
| − | = | + | =Versuch1= |
<ggb_applet width="1200" height="478" id="108943" /> | <ggb_applet width="1200" height="478" id="108943" /> | ||
| + | {| style="height: 145px;" width="581" | ||
| + | |- | ||
| + | || | ||
| + | || | ||
| + | || | ||
| + | |- | ||
| + | || | ||
| + | || | ||
| + | || | ||
| + | |- | ||
| + | || | ||
| + | || | ||
| + | || | ||
| + | |} | ||
| + | <br /> | ||
| − | |||
| − | == Image-Map == | + | ==Anmelde-Button auf der Startseite== |
| + | ==Image-Map== | ||
| + | |||
| + | <bs:checklist value="false" /> | ||
<imagemap> | <imagemap> | ||
| Zeile 28: | Zeile 45: | ||
</imagemap> | </imagemap> | ||
| − | == | + | ==Slideshow== |
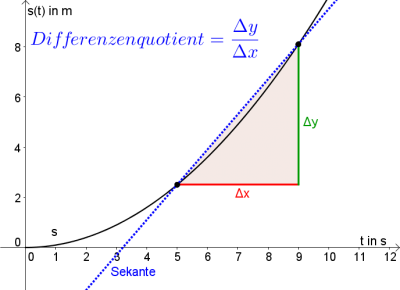
| − | + | <div style="width: 100%; text-align: center; background-color: #ffffff; height: 300px; border-bottom: 1px solid;"><div style="width: 60%; margin: 1% 10% 0% 20%;">[[Datei:Slide-diffquotient.png|center|link=http://matura.marienberg.at/index.php/Differenzen-_und_Differentialquotient|400px]]</div> | |
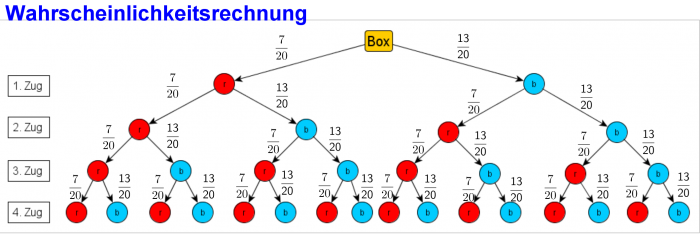
| − | <div style="width:100%; text-align: center; background-color:#ffffff; height:300px; border-bottom:1px solid;"> | + | <div style="width: 60%; margin: 2% 5%;">[[Datei:Binomialverteilung-Kugeln-mW=500px.png|center|link=http://matura.marienberg.at/index.php/Wahrscheinlichkeitsrechnung|700px]]</div> |
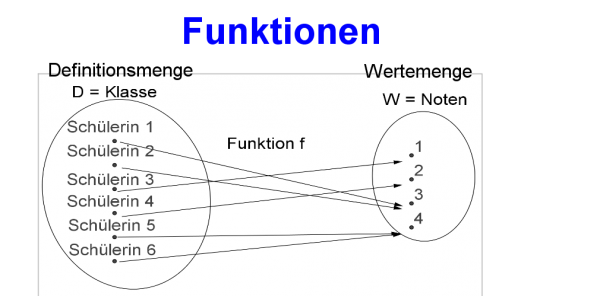
| − | + | <div style="width: 60%; margin: 0% 10% 0% 15%;">[[Datei:Slide-Funktion-Def.png|center|link=http://matura.marienberg.at/index.php/Funktionen|600px]]</div> | |
| − | <div style="width:60%; margin:1% 10% 0% 20%;">[[Datei:Slide-diffquotient.png|center | + | <div style="width: 60%; margin: 0% 10% 0% 15%;">[[Datei:Slide-Halbierungszeit.png|center|link=http://matura.marienberg.at/index.php/Wachstums-_und_Zerfallsprozesse|600px]]</div> |
| − | <div style="width:60%; margin:2% 5%;">[[Datei:Binomialverteilung-Kugeln-mW=500px.png|center | + | <div style="width: 60%; margin: 0% 10% 0% 15%; text-align: center;"> |
| − | <div style="width:60%; margin:0% 10% 0% 15%;">[[Datei:Slide-Funktion-Def.png|center | ||
| − | <div style="width:60%; margin:0% 10% 0% 15%;">[[Datei:Slide-Halbierungszeit.png|center | ||
| − | <div style="width:60%; margin:0% 10% 0% 15%; text-align:center;"> | ||
<imagemap> | <imagemap> | ||
Datei:Wiki-intro.png|350px|center|Klicken Sie auf ein Objekt in der Graphik, um auf die gewünschte Seite zu kommen. | Datei:Wiki-intro.png|350px|center|Klicken Sie auf ein Objekt in der Graphik, um auf die gewünschte Seite zu kommen. | ||
| Zeile 52: | Zeile 66: | ||
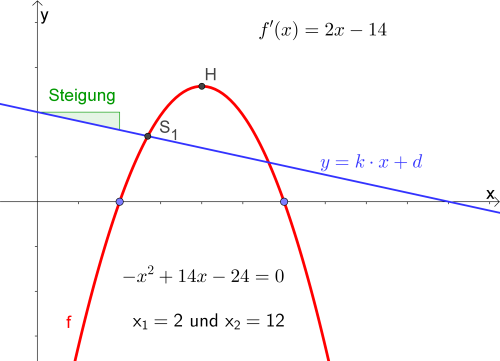
poly 648 1024 772 828 964 904 832 1092 640 1016 [[Quadratische Funktionen]] | poly 648 1024 772 828 964 904 832 1092 640 1016 [[Quadratische Funktionen]] | ||
circle 859 775 75 [[Schnittpunkt_zweier_Funktionen| Schnittpunkt]] | circle 859 775 75 [[Schnittpunkt_zweier_Funktionen| Schnittpunkt]] | ||
| − | </imagemap> | + | </imagemap>Klicken Sie auf ein Objekt in der Graphik, um auf die dessen Seite zu gelangen. |
| − | Klicken Sie auf ein Objekt in der Graphik, um auf die dessen Seite zu gelangen. | ||
</div> | </div> | ||
| − | |||
| Zeile 65: | Zeile 77: | ||
=Versuch 2= | =Versuch 2= | ||
| − | |||
| − | |||
{{#slideshow: | {{#slideshow: | ||
<div>Tick</div><div>Tock</div> | <div>Tick</div><div>Tock</div> | ||
| Zeile 75: | Zeile 85: | ||
syntax: | syntax: | ||
<nowiki> | <nowiki> | ||
| − | |||
| − | |||
| − | < | + | </nowiki> |
| + | |||
| + | [[Image:Image1.jpg|thumb|right|128px|Caption 1]] | ||
| + | |||
| + | |||
| + | [[Image:Image2.jpg|thumb|right|128px|Caption 2]] | ||
| + | |||
| + | |||
| + | [[Image:Image3.jpg|thumb|right|128px|Caption 3]] | ||
| + | |||
| − | |||
| − | |||
| − | |||
| − | == slideshow2== | + | ==slideshow2== |
<div id="banner"> | <div id="banner"> | ||
| − | <div style="margin:0% 20% auto; border:1px solid #ddd; box-shadow: 10px 10px 5px #ddd;"> | + | <div style="margin: 0% 20% auto; border: 1px solid #ddd; box-shadow: 10px 10px 5px #ddd;"> |
<imagemap> | <imagemap> | ||
Datei:Wiki-intro.png|500px|center|Klicken Sie auf ein Objekt in der Graphik, um auf die gewünschte Seite zu kommen. | Datei:Wiki-intro.png|500px|center|Klicken Sie auf ein Objekt in der Graphik, um auf die gewünschte Seite zu kommen. | ||
| Zeile 108: | Zeile 122: | ||
</imagemap> | </imagemap> | ||
| − | < | + | |
| + | <div style="text-align: center;">Klicken Sie auf ein Objekt in der Graphik, um auf die gewünschte Seite zu kommen.</div> | ||
</div> | </div> | ||
| − | + | <div style="width: 60%; margin: 1% 10% 0% 20%;">[[Datei:Slide-diffquotient.png|center|400px|link=http://matura.marienberg.at/index.php/Differenzen-_und_Differentialquotient]]</div> | |
| − | <div style="width:60%; margin:1% 10% 0% 20%;">[[Datei:Slide-diffquotient.png|center|400px|link=http://matura.marienberg.at/index.php/Differenzen-_und_Differentialquotient]]</div> | + | <div style="width: 60%; margin: 2% 5%;">[[Datei:Binomialverteilung-Kugeln-mW=500px.png|center|700px|link=http://matura.marienberg.at/index.php/Wahrscheinlichkeitsrechnung]]</div> |
| − | <div style="width:60%; margin:2% 5%;">[[Datei:Binomialverteilung-Kugeln-mW=500px.png|center|700px|link=http://matura.marienberg.at/index.php/Wahrscheinlichkeitsrechnung]]</div> | + | <div style="width: 60%; margin: 0% 10% 0% 15%;">[[Datei:Slide-Funktion-Def.png|center|600px|link=http://matura.marienberg.at/index.php/Funktionen]]</div> |
| − | <div style="width:60%; margin:0% 10% 0% 15%;">[[Datei:Slide-Funktion-Def.png|center|600px|link=http://matura.marienberg.at/index.php/Funktionen]]</div> | + | <div style="width: 60%; margin: 0% 10% 0% 15%;">[[Datei:Slide-Halbierungszeit.png|center|600px|link=http://matura.marienberg.at/index.php/Wachstums-_und_Zerfallsprozesse]]</div> |
| − | <div style="width:60%; margin:0% 10% 0% 15%;">[[Datei:Slide-Halbierungszeit.png|center|600px|link=http://matura.marienberg.at/index.php/Wachstums-_und_Zerfallsprozesse]]</div> | ||
| − | |||
| − | |||
| − | |||
</div> | </div> | ||
| − | == Cluster == | + | ==Cluster== |
| − | + | der Test ist cool | |
| − | der Test ist cool | ||
| − | |||
| − | |||
| + | <div class="clustersixoh">Dieser Bereich ist nur für die HLW (Cluster 6) relevant</div> | ||
| + | <div class="clustersixov"></div> | ||
der | der | ||
| Zeile 132: | Zeile 142: | ||
Test | Test | ||
| − | ist | + | ist |
das | das | ||
| Zeile 142: | Zeile 152: | ||
s | s | ||
asdf | asdf | ||
| − | sf | + | sf |
asdf | asdf | ||
| Zeile 149: | Zeile 159: | ||
af | af | ||
| − | ad | + | ad |
| − | f | + | f |
afd | afd | ||
af | af | ||
| − | a | + | a |
| − | sdf | + | sdf |
asf | asf | ||
a | a | ||
| − | |||
| − | |||
| + | <div class="clustersixuv"></div> | ||
| + | <div class="clustersixuh">dies ist ein Test</div> | ||
<headertabs /> | <headertabs /> | ||
Version vom 1. Januar 2016, 17:59 Uhr
Versuch1
Anmelde-Button auf der Startseite
Image-Map
<bs:checklist value="false" />
Slideshow

]]
<headertabs />
Versuch 2
{{#slideshow:
Tick
Tock
|id=bar refresh=1000 }}
syntax:
Datei:Image1.jpg
Caption 1
Datei:Image2.jpg
Caption 2
Datei:Image3.jpg
Caption 3
slideshow2
Klicken Sie auf ein Objekt in der Graphik, um auf die gewünschte Seite zu kommen.
Cluster
der Test ist cool
Dieser Bereich ist nur für die HLW (Cluster 6) relevant
der
Test
ist
das
asdf
Test s asdf sf
asdf a
af
ad
f
afd
af
a
sdf
asf a
dies ist ein Test
<headertabs />